


|
|
|
|
The xv ALE file is laid out logically, from top to bottom, and from left to right. There is only one section in this file, as all the components are to be placed within the same container.
As you read through this example, keep in mind that several types of definitions are being used:
Each one is slightly different, so try to be aware of the differences as we run through this example.
   // xv interface emulation; xv is copyrighted by John Bradley.
   // All rights reserved.
   // No copyright infringement is intended.
   // The creators of ALE and its documentation
   // have only the highest regard for xv.

   // Top section components consisting of logo and
   // two rows of buttons equal to the height of the logo

   section main
   {

      logo(p, p, 5, 5, LT)
The first entry, section main, defines the entire dialog. The section will have an ending }, as you would expect.
First, let's look at the logo placement and attributes:
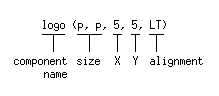
Also, it's important to note here that the point defined by X,Y is a point around which the component will be aligned. In this example, the point is 5 pixels from the dialog's left side and 5 pixels from its top. The alignment attribute (here defined as LT, or Left Top) determines where the component will lie relative to the X,Y point. The first letter specifies the alignment in X and the second letter specifies the alignment in Y.
Now let's have a look at the two rows of buttons that are defined to the right of the logo. These buttons could be defined as either two rows, or as three columns, but in our example we use two rows.
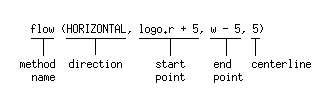
flow(HORIZONTAL, logo.r + 5, w - 5, 5)
{
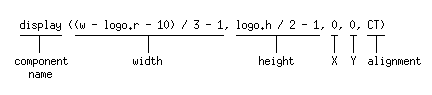
display ((w - logo.r - 10) / 3 - 1, logo.h / 2 - 1, 0, 0, CT)
bitControl (display.w, display.h, 0, 0, CT)
algorithms (display.w, display.h, 0, 0, CT)
}
root (display.w, display.h, display.l, display.b + 1, LT)
windows (display.w, display.h, bitControl.l, display.b + 1, LT)
imageSize (display.w, display.h, algorithms.l, display.b + 1, LT)
The flow function is used to place several components one after the other in either a horizontal row or a vertical column. Flow has the following attributes: a direction (horizontal or vertical), a start point, an end point, and an opposing direction centerline.
So why do the examples always use these relative values rather than absolute values? Simply because we assume that a user might resize the window in some way. If the components are absolutely defined and the window can be resized, some components might not fit within a window that's made smaller, or if the user drags the window larger, the components will all congregate up in the top left corner, leaving a large empty area to the bottom and the right.
You can certainly use absolute values if you wish, especially if you plan to prevent the user from resizing the dialog.
The buttons within this particular flow are fairly complicated. The buttons are, to reiterate:
         display    ((w - logo.r - 10) / 3 - 1, logo.h / 2 - 1, 0, 0, CT)
         bitControl (display.w, display.h,                      0, 0, CT)
         algorithms (display.w, display.h,                      0, 0, CT)
The components defined within a flow function have width, height, X, Y, and alignment attributes, just as the logo object had. The breakdown looks like this:
Let's take it step-by-step:
(w - logo.r - 10) / 3 - 1
We know that the w variable is the value of the entire width of the dialog. We also know that the button should fit, in the X direction, within the space left over by the logo. We'd like to have some extra spacing, too, to make the button look nice. So (w - logo.r - 10) says, "Take the width of the entire dialog, subtract the amount of space used before the right side of the logo is reached, and subtract 10 more pixels from that." So if the dialog were 400 pixels, and the position of the right side of the logo were at 100 pixels, then (w - logo.r - 10) would be (400 - 100 - 10), or 290 pixels.
But we aren't done yet because we're defining the width of one button in a row of three buttons, so we have to leave room for the other two buttons. What we have right now is the definition of the width we want to use for all three buttons. So we'll take that definition and divide by 3 (for the total of 3 buttons). Using our example, each button would now be 130 pixels wide. But we've also specified that an additional pixel should be subtracted from that total, so each button would finally be 129 pixels wide.
logo.h / 2 - 1
This definition is somewhat simpler: Take the complete height of the logo (logo.h) and divide it by 2. Remember, we're going to have two rows of buttons, and we want the buttons to be all the same height. Then we subtract an additional pixel.
The other two buttons follow display's lead, having the same attributes.
That's the flow, but what about the second row of buttons?
The second row of buttons is defined in this manner:
      root      (display.w, display.h, display.l,    display.b + 1, LT)
      windows   (display.w, display.h, bitControl.l, display.b + 1, LT)
      imageSize (display.w, display.h, algorithms.l, display.b + 1, LT)
Why aren't these buttons defined within a flow? They could be, but they don't have to be. Instead, they can simply refer to the positioning of the buttons within the previous flow.
Let's look at the root button, but skip to the important parts.
For example, if we had defined the X,Y point to be relative to the bottom right corner of the flow buttons (i.e., root (display.w, display.h, display.r, display.t - 1, BR)), then our alignment would be to BR, Bottom Right.
If you're feeling comfortable with ALE file structure, go ahead and experiment with an interface of your own. You can either copy the original examples and edit them, or start fresh with a new file.
If you feel you need a little more work on the structure, keep reading.
Now we'll tackle xv's Message Area listbox and the column of buttons that appear to its right.
//Message Area on the left and a column of buttons to its right
//Buttons are distributed evenly to the height of the Message Area
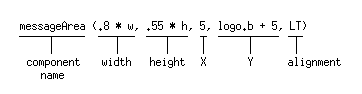
messageArea (.8 * w, .55 * h, 5, logo.b + 5, LT)
flow(VERTICAL, messageArea.t, messageArea.b, w - 5)
{
next (w - (messageArea.r + 10), messageArea.h / 7, 0, 0, RC)
prev (next.w, next.h, 0, 0, RC)
load (next.w, next.h, 0, 0, RC)
save (next.w, next.h, 0, 0, RC)
print (next.w, next.h, 0, 0, RC)
delete (next.w, next.h, 0, 0, RC)
files (next.w, next.h, 0, 0, RC)
}
Let's look at the Message Area:
Now let's look at the flow section.
flow(VERTICAL, messageArea.t, messageArea.b, w - 5)
Here, the flow is a vertical flow that starts at the message area's top and ends at the message area's bottom. It is also defined to have a centerline that is 5 pixels to the left of the dialog's right side.
And the buttons within the flow?
       next    (w - (messageArea.r + 10), messageArea.h / 7, 0, 0, RC)
       prev    (next.w, next.h,                              0, 0, RC)
The button next has a width that is defined relative to both the messageArea component and the dialog box: add 10 pixels to the right edge of the messageArea component, and then subtract that value from the width of the dialog box. This causes the button to take up the remaining width of the dialog box, but with 10 pixels of surrounding space left over. [The flow definition, if you remember, includes a centerline that is 5 pixels shy of the dialog box right side, so the flow definition and the button definition combined cause the button to fall in the center of the leftover space.
The next button's height is defined as one-seventh of the messageArea's height. Because seven buttons are defined within this flow, this is a shortcut way of ensuring this button will be proportional to the messageArea, and you can guess that the other buttons will be defined to be exactly the same height.
Because the flow handles the positioning of the buttons, their X and Y values are left at 0. Any alignment setting is still honored.
Once the next button is defined, the following buttons, because they are meant to be the same size as next, are all defined to have the same width and height as next.
If you're still stumped by all of this, try looking through Interface Layout for more details on putting components where you want them. You might also try compiling one of the examples, then editing a copy of the ALE file to see what happens when you resize and reposition components.